
THE ELECTRIFYING CONCLUSION
to our 6-day hands-on EV conversion workshop

started out with desk time of course! Sadly we had to announce that one of our students had to leave unexpectedly to attend to a family medical emergency and would miss the last day of the workshop. We all extend best wishes to Chris & his family.

Look at Bill's arm muscles even when he is just waving his hands around in the air explaining final checkout procedures and establishing the morning agenda!

There were a few trivial things everybody was itching to finish up on the car before we could spin the wheels. During the morning we also hoped to include a brief lecture by Glenn on electrical calculations/relationships and some time to cover resources in calculating for range, motor size & battery pack, but those activities wound up happening in the afternoon and I didn't get to document either because I was on a crucial supply run for coffee -- our only emergency material need of the day except for some optional WD-40!

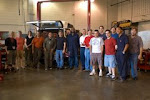
I wish I had audio of the harmonious buzz of voices that I was hearing when I snapped this shot of everybody under the Miata animatedly discussing plans with their respective break-out groups.

In the purely automotive department, the transmission needed to be refilled with gear oil

and the standard underbody shield had to be reinstalled.

That is the grooved dark panel being installed above; the underbody shield was then extended with a sheet of corrugated polyethylene, nicely lit by the hanging light in the arty photo below.

Jack came up with the idea & donated the materials for this solution as well as neatly executing it. Extending the underbody will not only protect the motor from road-splash and grit but will also improve aerodynamics and thus increase range slightly. Every little bit helps: this goes true for maximizing range and success in group projects!

Our (now fully-wired) charger is located under the panel behind the seats, and the peninsular covering piece above is somewhat raised, creating vents which will permit cooling air to circulate around it. If we want to cover it with the usual mat we would have to come up with another venting solution, but I kind of like the chromey futuristic look of the naked rear shelf at the moment. At this point of course we were all focused on rolling and not on aesthetics or cooling questions!

Here we are all grouped up to watch some voltage testing -- Ralph is holding a protective sheet of plexiglas for the batteries. Again, we can roll without the tweaks but we are lining them up for the future -- our Miata will, after all, be a show vehicle as well as a daily driver. Expect to see it on display at the Energy Fest in Kempton PA in September!

I just really loved all the teamwork: look, here are two people with their hands on one voltmeter, and not because either one of them is just learning how to measure voltage -- they are sharing the experience of taking the necessary readings to make sure our high-voltage wiring is correct all through the series. A systematic check of all connections is required before we close the circuit.

Teamwork was also happening in the rear, where we needed to plug the hole in the trunk that used to carry the fuel line -- obviously this was not necessary to roll, but it IS necessary to protect our trunk battery pack from moisture by covering this larger hole (we will caulk around the battery box later).

In the front it was time to wire up the Soliton Jr controller to the laptop and start calibrating for the final high-voltage connections! The car was built to this precise point, but did not pass its run test in Lancaster last Thursday (my that seems like a long time ago). So even though Bill & I got to see it all put together once before and knew all our components would fit, I have yet to see the system prove itself and make the car go.

I am going to admit that at this point I had a little stab of anxiety that just like on our 7/21 test the wheels would once again not spin once we hooked up the high voltage cabling, and we would be struggling with little blinking red and green lights on the controller for the entire rest of the day and Not Roll. I had to go out into the parking lot and chant "om nama shivaya" for a while until I felt better.

Owing to having to go outside to ground & center I forget what Jack was exactly up to here when I came back in. All the green lights on the BMS are lit (this is just the 'on' signal as the batteries are not charging at the moment).

Dan is making another voltage check. We have an issue, it seems; our controller is giving us the message that the 12v auxiliary battery is under-charged. We will not be able to close our connection and spin wheels without it.

The rear-hole plugging project was progressing nicely. Ben & Grant have engineered a truly elegant sollution and are happily installing it together. Note the stylish light blue rubber mat covering the old fuel line hole.

The owner of this hand was kneeling in the driver's seat of the Miata to ratchet the final bolts in. This was extremely entertaining to watch in person.

Meanwhile the 12 v battery attained a normal charge so we could clear that error from the controller ..

after some RTFM'ing.

These changes along with some throttle calibration should give us the literal green light to spin the wheels ... and they did!

It was just before noon when Julie got in to turn the key and press on the pedal -- and the wheels spun! Forwards and backwards!
OH MY GOSH WE PASSED OUR RUN TEST BEFORE LUNCH - that is a record for our workshops and I almost died of happiness right on the spot. Okay that is an exaggeration but I did cry a little bit with relief.

I got back from lunch late on account of the aforementioned coffee run, only to find that this was the class that just would not quit solving problems! After the postponed lecture from Glenn, instead of wanting to roll out the car immediately they were all about "We want to calibrate the minimum and maximum throttle with this nifty controller interface" and "We want to hook up the tachometer" and "We want to check out the BMS during charging and see if it really balances the cells." SO it was back to the laptop and the voltmeters and the little blinking green lights for a little while before we took the car off the lift.

Brandon texted me right after our initial failed run test, "Soliton has great reputation for ease of setting adjustments." (I think just getting & understanding this text about my controller qualifies me as half-geek.) Of course, it's wise to investigate further when someone references reputation -- you don't know anything till you ask what their source was. (Sometimes it was a salesman/corporate shill, or perhaps just some clueless person with no actual experience of their own either.)
Well, I had occasion to witness quite a few setting adjustments on this controller today, and it actually was easy. Now, Soliton's reputation is not just reputation: it is fact.
It is totally slick to be able to troubleshoot your own controller using a web browser and without requiring internet access (we did not have wireless in the shop). You just need an RJ-45 cable and you wind up communicating directly with the controller's CPU. Because you're working thru a familiar browser there's no program to download or new interface to learn. Needless to say, from an EV driver's point of view this set-up is far superior to having to box up an essential drive component like the e-Van's Curtis controller and mail it off for adjustment to somebody else who can tinker with the MOSFETs and diodes! Self-diagnosis & adjustment = more actual driving time!
So this is a blissfully simple-sounding set-up, and I also can testify that it completely worked the very first time we tried it. Furthermore, one of the things Richard & Grant first did with it (calibrating the throttle) was exactly what most excellent technical consultant Christian Ruoff had immediately recommended when Brandon inquired about our no-run scenario on 7/21. Christian also offered to be available for phone help in the evening if needed. We were about to take the car back apart so we didn't take him up on that ;-)
Some of our other kit components for this build arrived mislabeled, poorly documented, or with mismatched parts that rendered them effectively broken. Not so our Soliton Jr. controller. Thanks EVKinetics, this is what I call a quality and well-supported product, and hey some of you other suppliers: we are fans of competence here at Bucks County Renewables so level up!

After this there was kind of a blur of activity around tachometer, charger, and ampmeter, and I frankly started to lose track because I was so excited to get the car rolling.

Ralph and Dave are investigating the E-Xpert Pro ammeter/state of charge gauge. It was successfully wired up so we can monitor pack amp-hours remaining as well as state of draw and also some other goodies which I have not fully investigated.

Rich stripping cable to hook the original tach up to our controller. Once wired, all he & Dan had to do was tap on the laptop some more to tell it, "Hey, Soliton, Jr, accept 4 pulses from output 1 in order to read the tach wire going to the motor." Then came the spin test & lo and behold -- factory tach is now registering the motor's RPM's! I overheard someone explaining that this would have been more difficult with a digital tachometer, & I'm not sure if the later model Miatas gave up the analog or not, so this might affect the ease of this set-up, which anyway our team made look easy and the results were pretty rad.

Okay, everybody in the class is now clustered around the back of the car because the last little red lights on the BMS have winked out.

Our lithium-ion cells are balanced and it't time to roll the car off the lift and let it hit the road for the first time as an electric vehicle.
WE ROLLED!
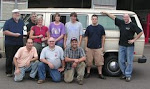
Everybody got to drive it (except Chris Gillespie from the Green Jobs Academy -- and after she came out to join us and took tons of video and stills of everybody behind the wheel!). I'll post the link when those go up on the GJA website and we definitely owe Chris (a Miata owner herself) a test drive as soon as possible!
I want to express my thanks once again to Chris & Ira, our administrative supervisors and warm supporters at GJA & Bucks County Community College -- it is owing to their belief in this program that we ran with 10 students and were able to have such a blast.
Gratitude is also in order to Brandon Hollinger of BH Electrics for preparing the kit. He was so sad that work conflicts prevented him from being there in person and sends warm congratulations to everybody for a successful build.
WE ROLLED!
Everybody got to drive it (except Chris Gillespie from the Green Jobs Academy -- and after she came out to join us and took tons of video and stills of everybody behind the wheel!). I'll post the link when those go up on the GJA website and we definitely owe Chris (a Miata owner herself) a test drive as soon as possible!
I want to express my thanks once again to Chris & Ira, our administrative supervisors and warm supporters at GJA & Bucks County Community College -- it is owing to their belief in this program that we ran with 10 students and were able to have such a blast.

After regrouping for distribution of certificates of completion, thanks, and farewells, we dismissed class fifty minutes early (a workshop record). Bill and I were done removing every trace of the last week's activity from our classroom by just a little after our official end-of-day at 4.

But we didn't leave quite yet ...
The Miata appeared to have a significant driving problem following conversion; on the white board notes for the afternoon you might have noticed that we were having problems with the shift not staying in reverse. We knew the wheels would spin backwards, but the back-up lights did not work on the lift and we couldn't get into reverse at all on the test drive. The transmission worked fine before removal of the clutch -- we drove this car as an ICE for a few months prior to defossilization. So this sudden problem was really bugging Mr K.
As is his way, he magically fixed it.
And then he played.
Thank you, Bill.


