Saturday, June 27, 2009

Day 5 2009

Friday morning we gathered for our last review session of the prior day's activities and reading. These were always interesting discussions. In this particular one we spent some time talking about the role of the DC-DC converter (Bill had sneaked in after-hours and installed it himself instead of assigning it to a team the other day!) and the dashboard gauges. Since we left the existing small-gauge (low-voltage, low-amperage) wiring in place from 2007, this was a theoretical rather than a hands-on portion of the class.

We had a list of tasks for the morning. Lots to finish before the van can roll!

But there is also time for everybody to come take a peek at one last alternative fuel vehicle -- this one a SVO (Straight Vegetable Oil) conversion, or "greasecar." This 2005 Volkswagen Jetta TDI gets over 40 mpg gallon on diesel fuel -- and the same on used and filtered vegetable oil. Owner Bob spent the whole morning with us so that folks could come out, admire and ask questions instead of twiddling their thumbs between assignments or while waiting for another task group to complete their work. We are very grateful to Bob for his generous, impromptu visit, and to Stan of NMTCC for arranging it!

This is the tank for the used veggie oil, neatly installed in the former spare tire compartment in the trunk.


On the left above is the original diesel filter. and in the foreground the installed filter for the veg oil. A greasecar begins running on diesel, then switches to SVO when the engine reaches the proper temperature. Thus, they're ideal for people who do a lot of driving at a time, and less suitable for those who have limited commutes. The perfect long-range complement to an EV!

For more information visit Greasecar Vegetable Fuel Systems.
Bill is dying to put one of these into his diesel Benz, and the two of us have been dreaming for a little while about putting on a workshop on that process. Stay tuned--and email me if you have an interest so I can send you an announcement directly if & when this idea comes to fruition!

Meanwhile, back on the van, Rudy gets his first crimping lesson ...

from start to finish.

John also gets a chance to crimp while JJ and Bill ponder wiring issues in the background.

Paul's wiring up the speedometer, which had come unhooked somehow (so there was a little bit of hands-on work behind the dashboard after all!).

Now things are moving into high gear as the rear battery racks are mounted and the batteries installed.

Completed batteries in their battery racks.

For a while it looked like we might have to re-engineer some of the hold-downs, because some of the tabs had been installed backwards and there wasn't quite enough clearance for the passenger seat to latch. There was talk of making longer bolts, and my heart sank at the thought of another round of fabricating, welding and waiting for paint to dry. No way would the van roll by 4 if that had to happen! Instead Bill proposed an ingenious short-cut: make holes in the back of the seat to accommodate the battery racks. That was quick and easy, and it did the job, so whew!

Now Paul could move on to torquing down the washers on the batteries ...

and Rob and Vincent could begin wiring up the connections.

Everything began moving fast (above, wrapping orange electrical tape around the conduit sleeving for the long cable that will connect rear batteries to front batteries).

Meanwhile (and I have no pictures of this because I was too busy panicking) we had to weather a small crisis with the auxiliary DC battery. First Bill and Paul told me it didn't work and we would need to wait half an hour for a new Vanagon battery to get here from the auto parts delivery store. This turned out to be a joke -- ha ha, but with not even two hours left on the clock, it was too scary to be very funny to me! Then, guess what -- the working, but not-properly-sized for a Vanagon battery turned out to be the wrong size for the battery compartment.

There was some concern about stretching of cables and whether we'd be able to close the top of the compartment (we couldn't). At this point I blush to admit that I was so worried we wouldn't roll that I burst into tears! Everything depends on the DC battery, since without it the main contactor won't open. But I was reassured the e-Van could roll and we could safely test it with this temporary set-up.
I was incredibly relieved, though I was still sniffling a little when Leo gathered the class (plus a group of summer campers from NMTCC) to explain to everybody how all the major components of the EV system work together to make the vehicle go. It was an exceptionally lucid and educational review; Rob took a video of the whole thing, which I hope to post a link to on this site soon.  Note from the future: you can watch it here

After the overview of components, the safety check began. Following the steps outlined in our "bible," Bob Batson's EVAmerica conversion manual, Leo checked the voltages at each major connection.

With the safety checklist completed, we were ready to power up and test the main contactor and then the throttle linkage. This, of course, needs to be done with the van lifted off the ground, so up she went on the lift. When the key turned in the ignition, the contactor opened -- but when the accelerator was pressed, nothing happened. No controller whine, no wheels turning. Oh no! And look what time it was!

I managed not to have a meltdown while the diagnostic scurry took place. In surprisingly short order it was established that actually, one of the long high-voltage cables had been installed backwards. (There had been some debate about whether to innovate on this aspect of the wiring because we'd switched the battery configuration around, or follow Bob Batson's original schematic -- in the end, Bob Batson was right! That's what we get for not following the bible!)

Bill informed me afterwards that we were very, very lucky that we didn't blow the controller. All that happened was that nothing happened -- much, much better than a pop and smoke, and the loss of a $1500 EV component! Not to mention that that would have put an end to our hopes of getting the van to roll ...

With the cable swapped around (and, incidentally, the proper Vanagon battery installed), Paul got the honor of turning the key on the second test. Key on, contactor open. Press down on the throttle and YES! The controller whined and the wheels turned!

This van wants to be electric -- but she also seems to want to get there at the last possible minute!

Bill backed the e-Van off the lift and out of the shop and took her for her first spin around the parking lot, and then everybody got to drive her. Check out all the EV grins in the photo collage below! I was so wobbly with relief that I didn't get shots of everyone behind the wheel but I hope class members will send them in (along with any video) so I can post them.


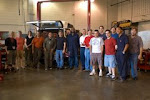
After a parting toast with non-alcoholic champagne and handing out of completion certificates, EV Conversion Workshop 2009 came to an official close with hugs, handshakes and farewells. This was really an amazing group of people who came together for a week to undertake a challenging project, worked together to solve countless difficulties under time pressure, and somehow managed to keep it all friendly, positive and fun! I am so grateful to Bill for leading us all through the process and to all the participants for their tremendous contributions.

There's a lot left to tidy up on the e-Van, of course. Leo sent a detailed list of the loose ends that need to be attended to in the wiring department -- and we still need to build battery boxes so that the batteries are safely enclosed. Bill and I are also hoping to give the van a paint job and spruce up the interior before show time at the PA Energy Fest in Kempton, PA September 18, 19, and 20!

Hope to see you there -- and in the meantime, I'll post regular updates on our progress and on the performance benchmarking. The rebuilt e-Van certainly feels speedier and more powerful, and an hour of testing didn't drop the battery-charge indicators at all -- but we'd like to get some numbers on our range and see if we've achieved our 50-mile goal!

Thanks for following along!
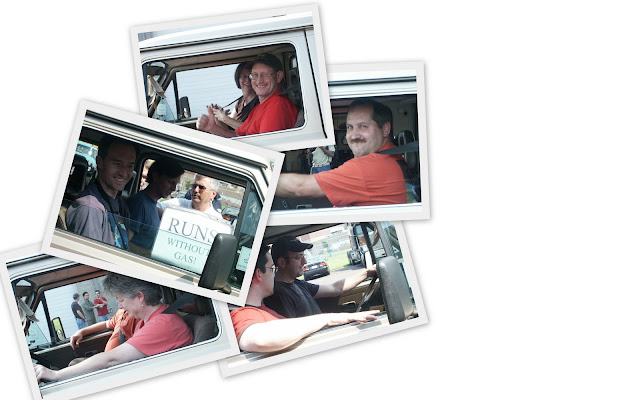
Friday, June 26, 2009

Day 4 2009

Less obsessively photographed detail in this entry and more of an over all view!

Today's tasks included cutting and recrimping of cables in order to wire the front battery box (A7n7), completing the rear battery rack and developing a hold-down system, installing conduit sleeving around all the high-voltage wire, and completing installation of the charger.

But with all these tasks assigned -- where is everybody? The auto lab is empty and so is the welding shop ...

They're all outside looking at the two vehicles Ken and Al of the Eastern Electric Vehicle Club brought to show off and answer questions about.

One of them was this unbelievably super-sweet mini-E. Ken, who's been driving a converted Geo Metro, put his name on the list to lease this vehicle back in late 2008 and just picked it up last week!


Only 500 of these vehicles have been made and 450 made available to eager would-be individual drivers. They were converted new (right off the assembly line, before ICE installation) in a deal between AC Propulsion and BMW/Audi. Featuring a 380-volt system and a lithium-ion battery pack, the mini-E's been getting 110+ miles on a charge -- though it takes some time to achieve full charge with the regular 110-volt charging cable Ken's holding below. (The high-voltage, quick-charge cables won't arrive for another month.)

The second vehicle on show was Alan Arrison's Green Rabbit -- champion of the 21st Century Automotive Challenge at Penn State in April.
Alan's vehicle, a 120-volt, Zilla-controlled, clean and beautiful conversion, drew a lot of admiring glances.

With a 50 mile range and a 60 mph cruising speed, this EV is used daily.

Alan and Ken are active and committed members of the Eastern Electric Vehicle Club who freely give of their time (and sometimes tow miles) to promote the joys of going gas-free.


Alan's battery wiring set-up is as pristine and orderly as his control board. And the professionally done plastic "aquarium" battery boxes offer superior visibility of the batteries. (All the EV components in the mini-E are locked away and invisible to the eye!)
After thanking Al and Ken and bidding them farewell it was back to work on the e-Van. First, the vacuum pump ...

then soldering the thermo-sensor to the motor ...

while Brett continued to work on the battery charger. The van will plug in through its old gas cap as do many EV's, but the location of the gas tank in the wheel well was, well, another Vanagon quirk!


Having been trained on using the grinder, Rudy starts making some sparks.
Then he trains Rob, and so on. We didn't do this kind of pass-along-the-knowledge with the welder, of course -- but everybody who wanted an opportunity to learn to weld had a chance to practice on scrap at least.


Vincent is no longer a novice welder, having done a considerable amount of the work on this rack!
It came to the paint shop so hot from welding that it had to be handled with gloves -- I was told that actually helps the paint stick better.


Our outdoor paint shop. We were incredibly lucky -- after several weeks where it rained every day, we were blessed with perfect paint-drying weather!

The rear rack is painted and ready to be installed on Friday.


And by the end of the day the A7n7 batteries had been wired together

and the former gas cap has such a slick-looking, professional charger outlet


that it almost made me weep with happiness.


Thursday, June 25, 2009

Meet the Students - Part II

John is an automotive technology instructor at North Montco Technical Career Center. He was busy during the last workshop in 2007 and was delighted to have a chance to participate this time around. John loves to learn from all different kinds of people and is always seeking opportunities to enhance his teaching and technical skills.


Nick is an ASE-certified master technician who admits his sister-in-law forced him to attend the workshop so he can convert her Kia. Nick says he's been a lifelong gearhead, "burning fuel and wasting energy" -- but now he is changing to a more energy-conscious lifestyle, including an organic garden and an effort to buy local foods.

Chris, from Wading River NY, is a fellow Vanagon owner who works for an internet hosting company. Having inherited a second Vanagon, he's looking into the possibility of converting one of his VW's to all-electric. This photo of Chris might have been the only time I didn't see him with a smile on his face during the entire workshop.


Vincent is a graphic designer who came up from Virginia with Rob and Rudy. Vincent says he "tries to learn something new every year." He has taken classes on electric wiring, solar hot water and photovoltaic installation, and radiant flooring. Now he's ready to learn something about electric vehicles.

David lives in Allentown PA and works for Lockheed Martin, where is he an electronic communications specialist. He saw the e-Van at the PA Energy Fest last year and is curious to learn whether he can use his knowledge from the aerospace industry to build a hybrid.


Paul teaches chemistry, physics and engineering at the High School of Engineering and Science in Philadelphia. He says he's been a gearhead since he got his driver's licence, and is enamored of EV's because from an engineering perspective they are far more efficient vehicles. He dreams of an electric muscle car, though he also has a Chevy S-10 that he could convert.

Wednesday, June 24, 2009

Day 3 2009

Day 3 was really pretty amazing. While our written agenda for the day, after discussion of the homework and reviewing Day 2's activities, included wiring in the old DC-DC converter, we switched that last task to addressing the on-board charger. Because there was no on-board charger in e-Van 2007, locating and properly mounting it needed to be done in order to incorporate it into the overall new wiring layout.

The charger is without a doubt my favorite upgrade. Wait till you see it!

So our work groups for the day became:
  • completing repair of van floor
  • installing the front drive battery racks
  • fabricating, painting and priming the rear trunk drive battery racks
  • mounting and wiring the potbox and controller in the engine compartment
  • mounting the battery charger
We also knew cables and lugs would be arriving at 10:30 a.m. so there would be crimping and heat-shrinking of cables to be done

During our morning discussion Matt shared with us a new mounting for the fusible link which serves as a safety fuse on the high-voltage wiring. As delivered to us from Bob Batson it was enclosed in thick, clear, flexible plastic. Matt mounted it on a rigid board instead which will also allow room for an identifying label. (Sorry, whoops no picture at the moment.) Labeling the high-voltage components and covering all the cable with orange sleeving are safety features we will implement during this upgrade. Leo is a volunteer firefighter and he tells us that, with the introduction of hybrid vehicles, all first responders are now trained to understand that orange cable means high-voltage, do not cut! This is a crucial safety tip for all drivers of EV conversions.


Matt had also done some homework on the physics of an accident involving heavy weights in the van. Here he is solemnly reviewing the physical forces involved if the batteries were to be released in an accident (this is just about them as inert, heavy objects flying loose around the van -- never mind the acid-filled and potentially explosive part for just now!)

Matt's lecture was a reminder of the importance of properly securing the batteries into the vehicle. The rack fabricated by the welding room team yesterday is pretty bomb-proof -- the tabs you see above are not what will be secured to the structural steel of the van, they are hold-downs for the top racks, made of angle iron. Long bolts will fasten the top rack to the bottom and be inserted into the tabs to make the entire containment system secure.

David and Rob are pop-riveting patches into place on the van floor. You can see that the patch was snipped out of the old front battery box (matching the rear one Rob is leaning on, which will remain as a storage compartment under the passenger seat).


JJ is cleaning the fans on the controller mount, which are filthy, of course (aren't fans always filthy unless someone cleans them?).

Bill introduces Paul to the small MIG welder in the autoshop. I learned yesterday that MIG stands for metal inert gas but I must admit that I had forgotten already. Now I've looked it up and maybe it will stick. Reading (or writing, in my case!) about this process really helps solidify all the information that is coming in so fast all day.

More information coming in fast as Leo explains something on the wiring diagram to Rudy.

Meanwhile Chris, Judy and Brett were working to locate that Zivan charger.

while John, Mike and Nick are working on the rear battery rack. (Leo and Rudy are still at the whiteboard in the background!)

We have two battery lifting tools. One is a flexible rubber strap with clips that is lightweight and mostly nonconductive. The other one is a big heavy clamp that is made of almost solid metal, with a wooden handle. Guess which one requires a lot of care and attention when you handle batteries with it (keep in mind that if you drop something heavy and metal on a battery, bad things can happen even when it's not wired up to anything). I wonder if Bill is having the students use that thing as a kind of Zen training in mindfulness when handling batteries at all times.

JJ and Leo are now working on hooking up the potbox and controller.

And Brett is under the van checking on charger location.

Nick is working on the angle iron for the front battery rack tops.

David, Vincent and Rob are working on the mounting of the front battery rack (also known to us A7n7 because of the two-by-seven battery configuration that it will contain).

The battery rack mounts need to be drilled...

and mounted, which involves a lot of under-the-van work.

Larry meanwhile is sketching out the rear battery rack configuration. I forgot to mention that he and I did a supply run to Hoover Steel for angle iron -- Larry's truck has now served to haul crucial cold rolled steel supplies for both workshops.


NMTCC faculty member Rich Matthias, who teaches engineering and robotics, came by to observe for a while and also took a spin on Matt's electric bicycle.
Modified from a standard electric bicycle called a "LashOut," this version tows about 4 times more oomf in the kiddie-cart behind. So today I got to ride briefly on an electric bicycle! That was a new one!

The top rack is coming into shape ...

and meanwhile crimping of cables has begun!

First one!

Failed the vise test! Oh well.

Drilling the front battery racks for mounting ...

and using a burr to smooth the mounting holes.

In the paint shop (that is, outside), the top racks ...


and mounting brackets are being painted, not for show but to protect against corrosion. Matt contributed the can of British racing green, which he had in his trunk.


The first finished and successfully vise-tested cable is measured, and it fits our battery configuration perfectly.

Now a cable-and-lug crew is formed.

At the end of the day, the potbox and controller were in.

Front rack battery racks were installed.

That beautiful 21st century-looking charger was fully mounted.


And there was an impressive pile of completed high-voltage cables, which I didn't get a photograph of, as you will probably be relieved to know because really this was more than enough!

But it was such a great day, and we got everything on our list done so wow! We are on schedule!

Till tomorrow, thanks for following along.